A Nitty-Gritty Packing Guide for Kilimanjaro
This was an attempt to de-clutter and un-complicate a gear list for Kilimanjaro trekking. But it really is the most detail-oriented packing list ever.
Our path was the 10 day Northern Circuit Route, however, this list can be adjusted for any route on Kilimanjaro. And you could probably use it for a Nepal trek too. Start by printing out a copy of your operator’s gear list. Then go from there…This list will help break down their recommendations.
First off, there is another human carrying your stuff! Pack accordingly. Porter’s load limits are set by the Kilimanjaro Porters Assistance Project (KPAP), and weight is not to exceed 15 kg or 33 lbs. My duffle weighed in at 27 lbs. The sleeping mat provided by our operator did not count, neither does your own daypack. My day pack was roughly 10-15 lbs depending on water weight for the day.
I already owned most of the items required, but made a few purchases. If you don’t already own, wait for sales or consider gently used items as outdoor gear can be expensive! Brands are only mentioned for product reference if you need somewhere to start.
My dad reminded me that for his climb in December ‘66 he had whatever (probably random) layers he was wearing, a sleeping bag, and cans of beans. I would have died from the cold & food alone. But it can be done…just not by me.
1. The Basics: Packs. Water containers. Sleeping Bag.

Andromeda also loves this duffle. [Visual description: Green duffle on carpeted floor with tiny grey cat ears poking out of the bag].
75-90 L waterproof duffle. This size may seem gargantuan, but with a bulky zero-down sleeping bag plus all your gear, anything smaller will be a squeeze. You don’t really need waterproof because the porters will put your bag into another waterproof bag. But you certainly do need something sturdy & this 80 L Outdoor Research (OR) one was worth the $ & will get plenty of future use in my household.
*You will pack your duffle into a hard-sided suitcase for travel. This protects the duffle from rough transport & gives you a container for all items left behind in town. Plus, you’ll want a suitcase that locks easily as you may be storing valuable belongings (see: passport, money) in the hotel while you’re trekking.
Day pack. If you own any daypack that fits comfortably, use that. You’ll need enough space for rain gear, layers, basic first aid kit, snacks, water, and anything else required during the day when you don’t have access to your duffle. I’ve owned the Osprey Kyte 36L daypack for at least 12 years & it has withstood countless day hikes, grimy bus trips, international travel (overhead bin friendly), and general abuse.
String backpacks. These are cheap, lightweight & we’ve accumulated plenty over the years at road races. They work great for wrapping filthy shoes & other gear, although this certainly isn’t a necessity.
Dry bag stuff sacks. (4-6 depending on your needs & sizes of bags). These are durable and allow consolidating your gear in a systematic way, while keeping everything dry.
My system varied from methodical to mess, but generally went something like: Medium size bag for socks and thinner layers, small for underwear, large for bulky layers, and at least one bag for truly filthy items that I did not plan to re-use on the trek. Roll everything (even underwear!), compress & release any excess air, and clip for the most compact & easy-to-pack bags.
*If you don’t know: Use bags overnight to stuff your clothes for the next day & to protect cold-sensitive electronics. Doubles as leg & back-support pillows.
Packing cubes. (or any small zippered packs) to organize anything else. I used two cubes to organize toiletries, food, & electronics. They help to avoid rustling through your duffle to find individual Ziploc’ed items.
One toiletry bag. It is useful to have a bag with a hook for hanging & plenty of zippered pockets, but not required. If you need to bring two toiletry bags, you have too many toiletries (yes, that was me).
Ziplocs. Varying sizes. I had 1-2 gallon size and multiple quart size which were mandatory for keeping items protected & arranged.
Water Bladder. You will obviously need one that is compatible with your day pack. I used my standard Camelbak. A mouthpiece cover is strongly advised so you aren’t drinking dirt, as is an insulated drinking tube cover to (kind of) prevent freezing up high.
1-2 Water Bottles. I just brought one 1L Nalgene and that was enough. You’ll want the bottle for in-camp, teeth brushing, and for adding electrolyte powder or tabs. Our guides advised that some people are disgusted by the electrolytes once at altitude, so suggested adding them to the bottle versus the bladder.
*Tip: On summit night, I was given 4 liters of water which was far too much water and made my pack unnecessarily heavy. All your water will freeze on that night anyway! I get that water is vital, but don’t let anyone talk you into more than you will drink…I learned the hard way.
Zero-down sleeping bag. I did not want to buy a zero-down bag, or hassle with hauling one in checked luggage. It took me just one frigid night to realize that my rental bag from our trek operator wasn’t in the best shape despite the fancy brand name. So. Either bring a good quality zero-down of your own, or make sure your operator has a rental bag with quality life. Yes, it really does get legit cold overnight!
Sleeping bag liner. You need a wool one to add a few degrees extra warmth & to keep the actual sleeping bag clean. These always remind me of oversized wool condoms. Anyway…
2. Layers: Top Half.

Smartwool base layer, sun shirt, light down, lightweight fleece, bulky fleece. After being washed several times post-trek. [Visual: those layers hanging on line].
2 quick-dry short sleeve shirts & one quick-dry tank. Any brand. Two shirts are plenty, three was excessive. Don’t worry, you will stink no matter what! My top picks are the Under Armour heat-gear tank with long torso & a discounted Patagonia T-shirt. Pick two that sort-of match your pants. Or not.
2 sports bras. Bring two that are comfy & can be worn constantly! I personally like the Nike Dri-FIT Swoosh for simplicity & support.
2 long sleeve base-layers. Wool is ideal! I used one for hiking on colder days & the second layer for camp & sleeping. I layered both for summit night.
1 lightweight long sleeve sun shirt with hood. I wore this particular REI sun shirt with SPF almost every day during the trek and on a one-day safari. The fit is unflattering, so I tied a hair elastic around the waist to have a less matronly look. But, a lightweight long sleeve is worthwhile regardless of crappy fit. Mine was light enough for warmer days & protected everything (except my poor, cracked hands) from sunburn.
Alternate between your hiking wool base layer & sun shirt depending on the day. Make sure you can layer the two when needed.
1 Lightweight fleece. Mine is an ever-reliable lightweight but warm fleece/light down hoodie combo which somehow both fits over and under everything else.
1 Heavier-weight fleece. This was my bulkiest item, but I was so grateful to have this in-camp, summit night for the climb, overnight, and back in town. No regrets! Wore it every single day!
Lightweight down vest (optional). My favorite is a hot pink non-bulky down vest. Very light and packs down super small. I couldn’t spare any additional room for weighty upper layers. If you get really cold like me, this is a useful option.
Down coat. Make sure it is packable but cozy! You’ll need it for in-camp & summit night. Even overnight on the chillier nights. I was in the market to buy a new down & this OR coat is pricey but perfect. 11 stars! If you rent a coat from your operator, make sure to calculate in the coat weight/bulk to your overall duffle.
Raincoat. I’ve owned an OR one forever & that worked just fine as a windbreaker/raincoat. Just make sure to have quality rain gear (no visitor center parkas!) and you’ll be okay.
Bonus layer (optional): Las Vegas Aces World Championship T-shirt. I actually wore this over my base layer in camp every day & then held it up for my summit picture because, why not?! I really only approve of this extra layer if it is Aces gear.
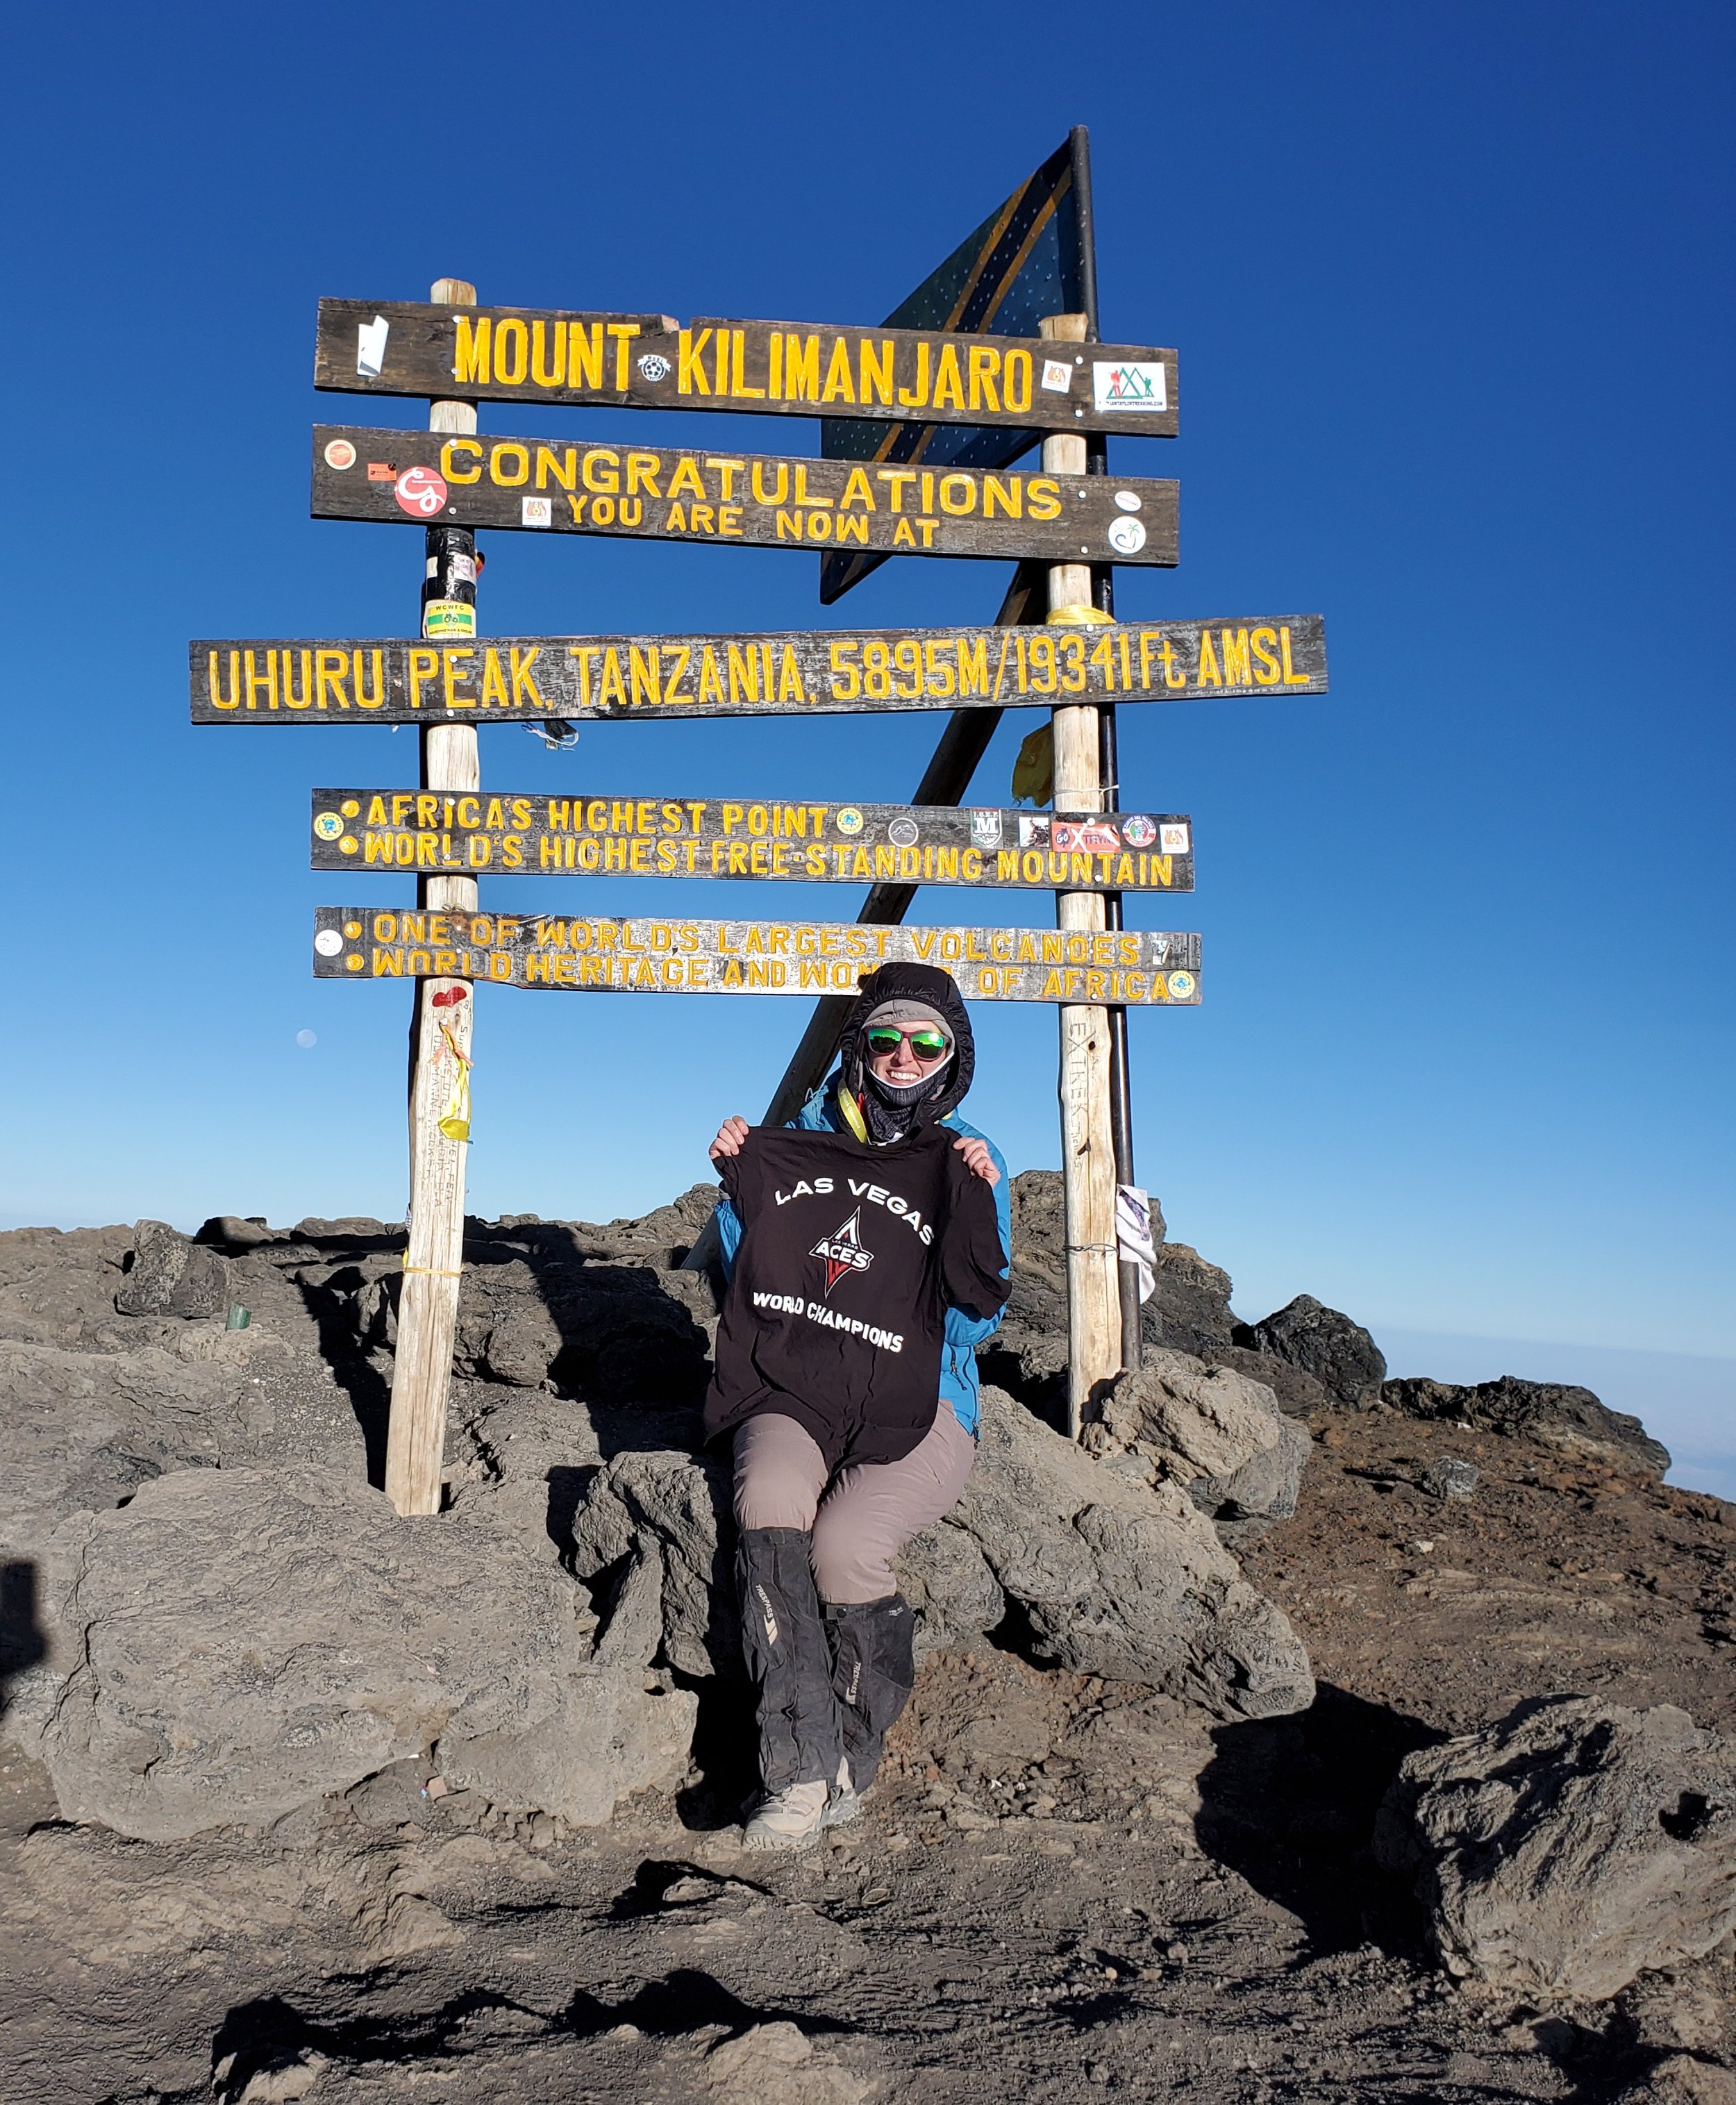
[Visual description: Wooden sign says: Mt. Kilimanjaro. Congratulations you are now at Uhuru Peak Tanzania 5895M/19341FT. Africa’s Highest Point. World’s Highest Free Standing Mountain. One of the world’s largest volcanoes. World Heritage and Wonder of Africa. Me sitting below the sign with all of my 9 upper layers & 3 bottom half layers & borrowed gaiters. And holding The Las Vegas Aces Championship T-shirt. The only layer I didn’t wear!]
Summit night upper half summary: Under Armour tank top (for length), tighter smart wool base layer, oversized wool base layer, sun shirt, lightweight fleece, hot pink down vest, heavy fleece, down coat, rain coat. I was satisfied & the only layer I removed during the ascent was the rain coat.
3. Layers: Bottom Half.
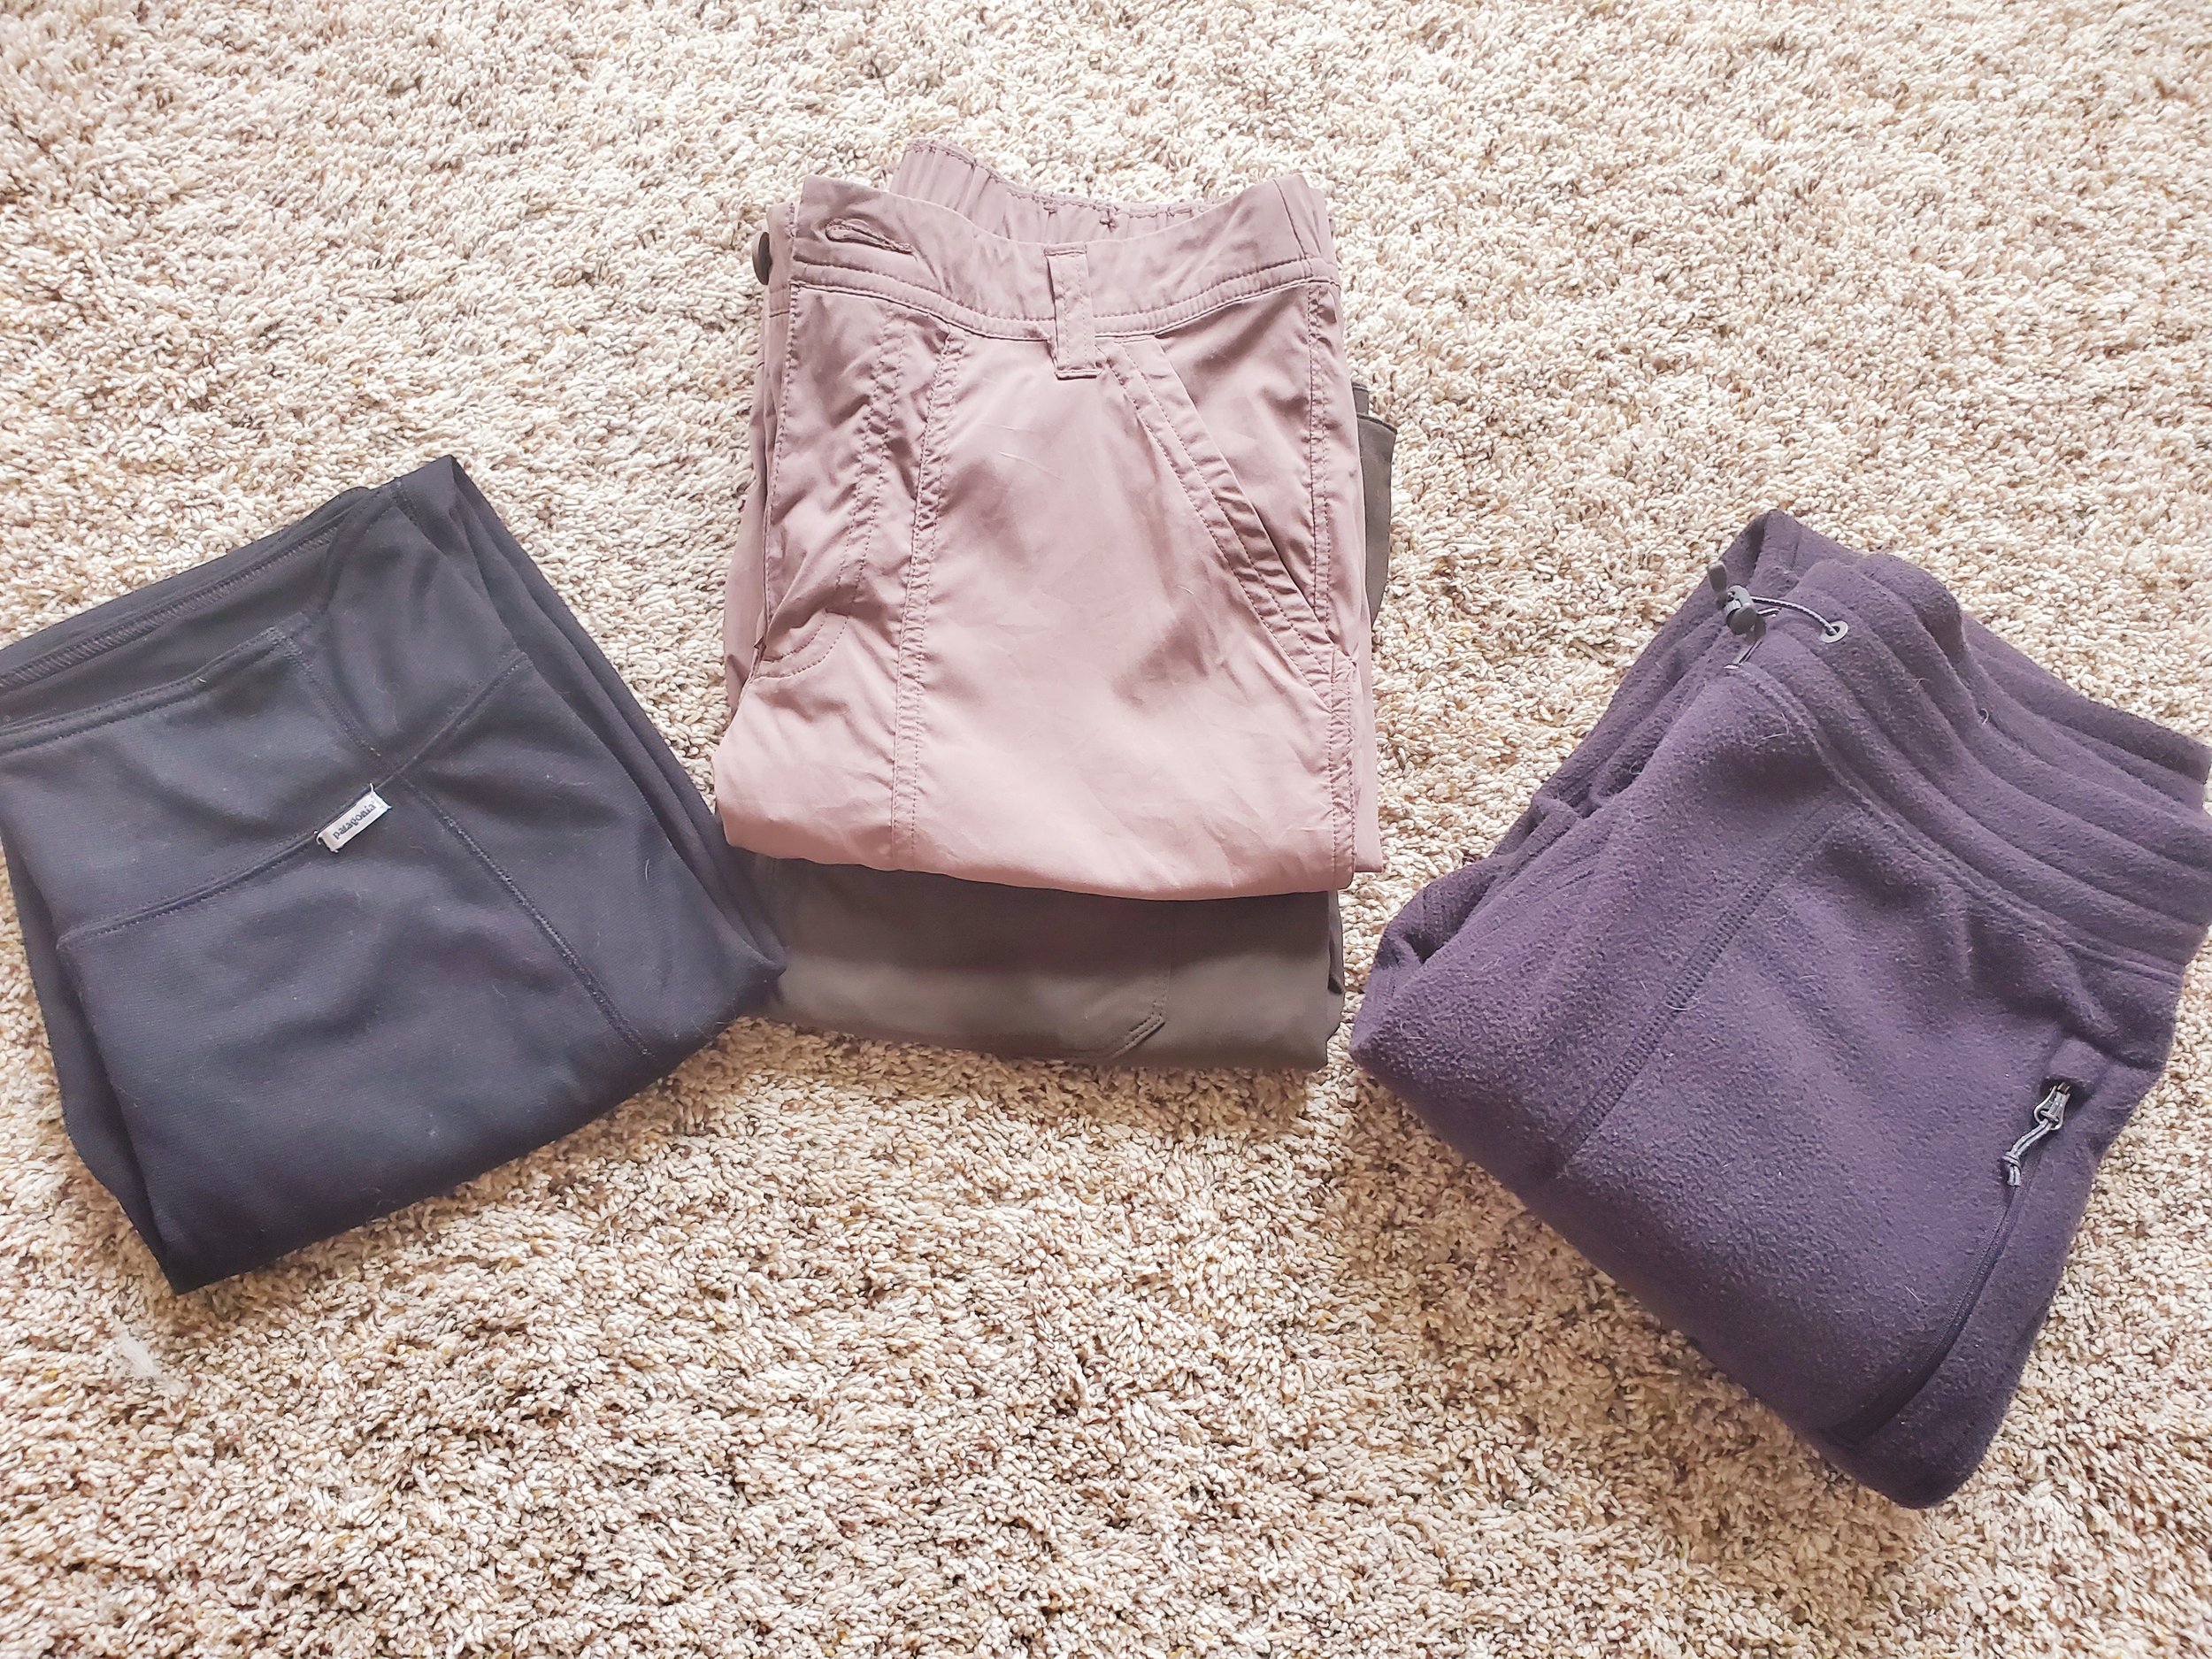
[Visual description: Long, black fleece underwear, two hiking pants (green & khaki), grey fleece pants stacked on floor]. Rainpants (not pictured). You don’t need much…
2 quick-dry hiking pants. I debated shorts, glad I didn’t bring them. The pants prevented: sunburn, revealing hairy/unshaven legs (the horror!), mosquito bites (lower elevations), and unintentional cultural offense. I was told it really isn’t offensive in touristy areas, but perceived as childish. I did bring a pair of shorts to wear in town which worked, even if I looked like a kid to locals.
1 smart wool down underwear/leggings. These were necessary in camp, overnight, and certainly summit night. Make sure they are a pair that you are comfortable hiking in for 12+ hours. Thankfully, I did not need them for any other day-hikes. Two pairs may come in handy depending on the time of year you are trekking!
1 fleece pants. These pants are a godsend and (after nearly freezing to death at Shira I camp) I layered these over my long underwear every night. I didn’t enjoy hiking in these, but you really do need a pair of fleece pants.
1 rainpants. Never wore mine on the trek. But, of course you need to bring them…full side zippers recommended for convenience and venting.
Belt. So, finding a hiking belt is a whole thing if you don’t already have one. Why do belts need to be gendered?! (They don’t). The only one in the women’s section was in baby blue—just no. Here is my advice: Go to the men’s section at your outdoors store of choice. The issue with “men’s” belts is they tend to be too wide for most women’s hiking pant belt loops. Try to find a thinner belt that fits through your hiking pant belt loops & then cut to appropriate size. Good luck.
Gaiters. Mine were labeled “vintage old-school” by our guides and I wore them for 10 minutes on the first day before ripping them off due to embarrassment and discomfort. Gaiters will help save your pants/shoes/socks from dust on a daily basis, but I survived without. They are best for the summit to avoid all the scree in your shoes. Our guide loaned me an extra pair for that purpose. I’m still not all that sold on gaiters, but they are useful if you have a functional pair. Maybe I’m just accustomed to scree at this point.
Sock liners & Socks. Wool! I prefer Darn Tough brand. I rarely use liners, so depends if you prefer those or not. I swear you will not change your socks every day, so a pair per day is excessive. That said, I did need to wear three pairs of socks at night. My feet were corpse cold. I even put them inside my down mittens.
Down booties. Yeah, I didn’t bring those and very much regretted it. Next time!
Summit night lower half summary: Underwear (we’ll get to that), smart wool leggings, fleece pants, hiking pants, sock liners plus thicker wool socks. This was okay for the ascent, but I got very overheated & miserable on the lengthy descent. There really isn’t a discreet place to remove layers. If I repeated this trek, I would consider wearing long underwear, hiking pants, and rain pants instead. Rain pants with zippers are much easier to remove if needed.
4. Underwear.
You need enough pairs of underwear for each day! Hand washing pairs is tricky due to limited water & chilly temps. My quick-dry underwear took several days to fully dry.
As far as type of underwear, I have so much to say on this topic it needs it’s own post. So…underwear post pending! In brief, my votes are for : A) Wool B) Period underwear C) Synthetic with cotton or wool gusset
5. Shoes.
I have small feet & the luxury of small shoes. So I brought & used three pairs. You can get away with two pairs! If you have foot or ankle issues, plan well. I brought my custom orthotics & bilateral ankle braces. I wore those items religiously.
Hiking boots. Make sure these are well broken-in prior to the trek! I personally can’t stand high-top boots, so my low-top Merrell’s worked fine. The guides noted when the day included a rockier path, and of course the boots were necessary for the summit.
Tennis shoes. I am used to & prefer hiking in my Hoka trail runners. This is mostly fine on Kili since you are always on a trail, although I was happy to switch between boots & shoes. If you go during a snowy month, you’ll likely want boots instead.
*Note on low-tops: If you opt for low-tops, I do recommend quality ankle braces. A basic sprain could ruin your entire trek!
Slip-on camp shoes. I found these Bogs Snowday Slippers on-sale & they were perfect for around camp & middle-of-the-night bathroom trips. Just find lightweight slip-ons with decent tread.
6. Coat, Hat, Gloves, etc.
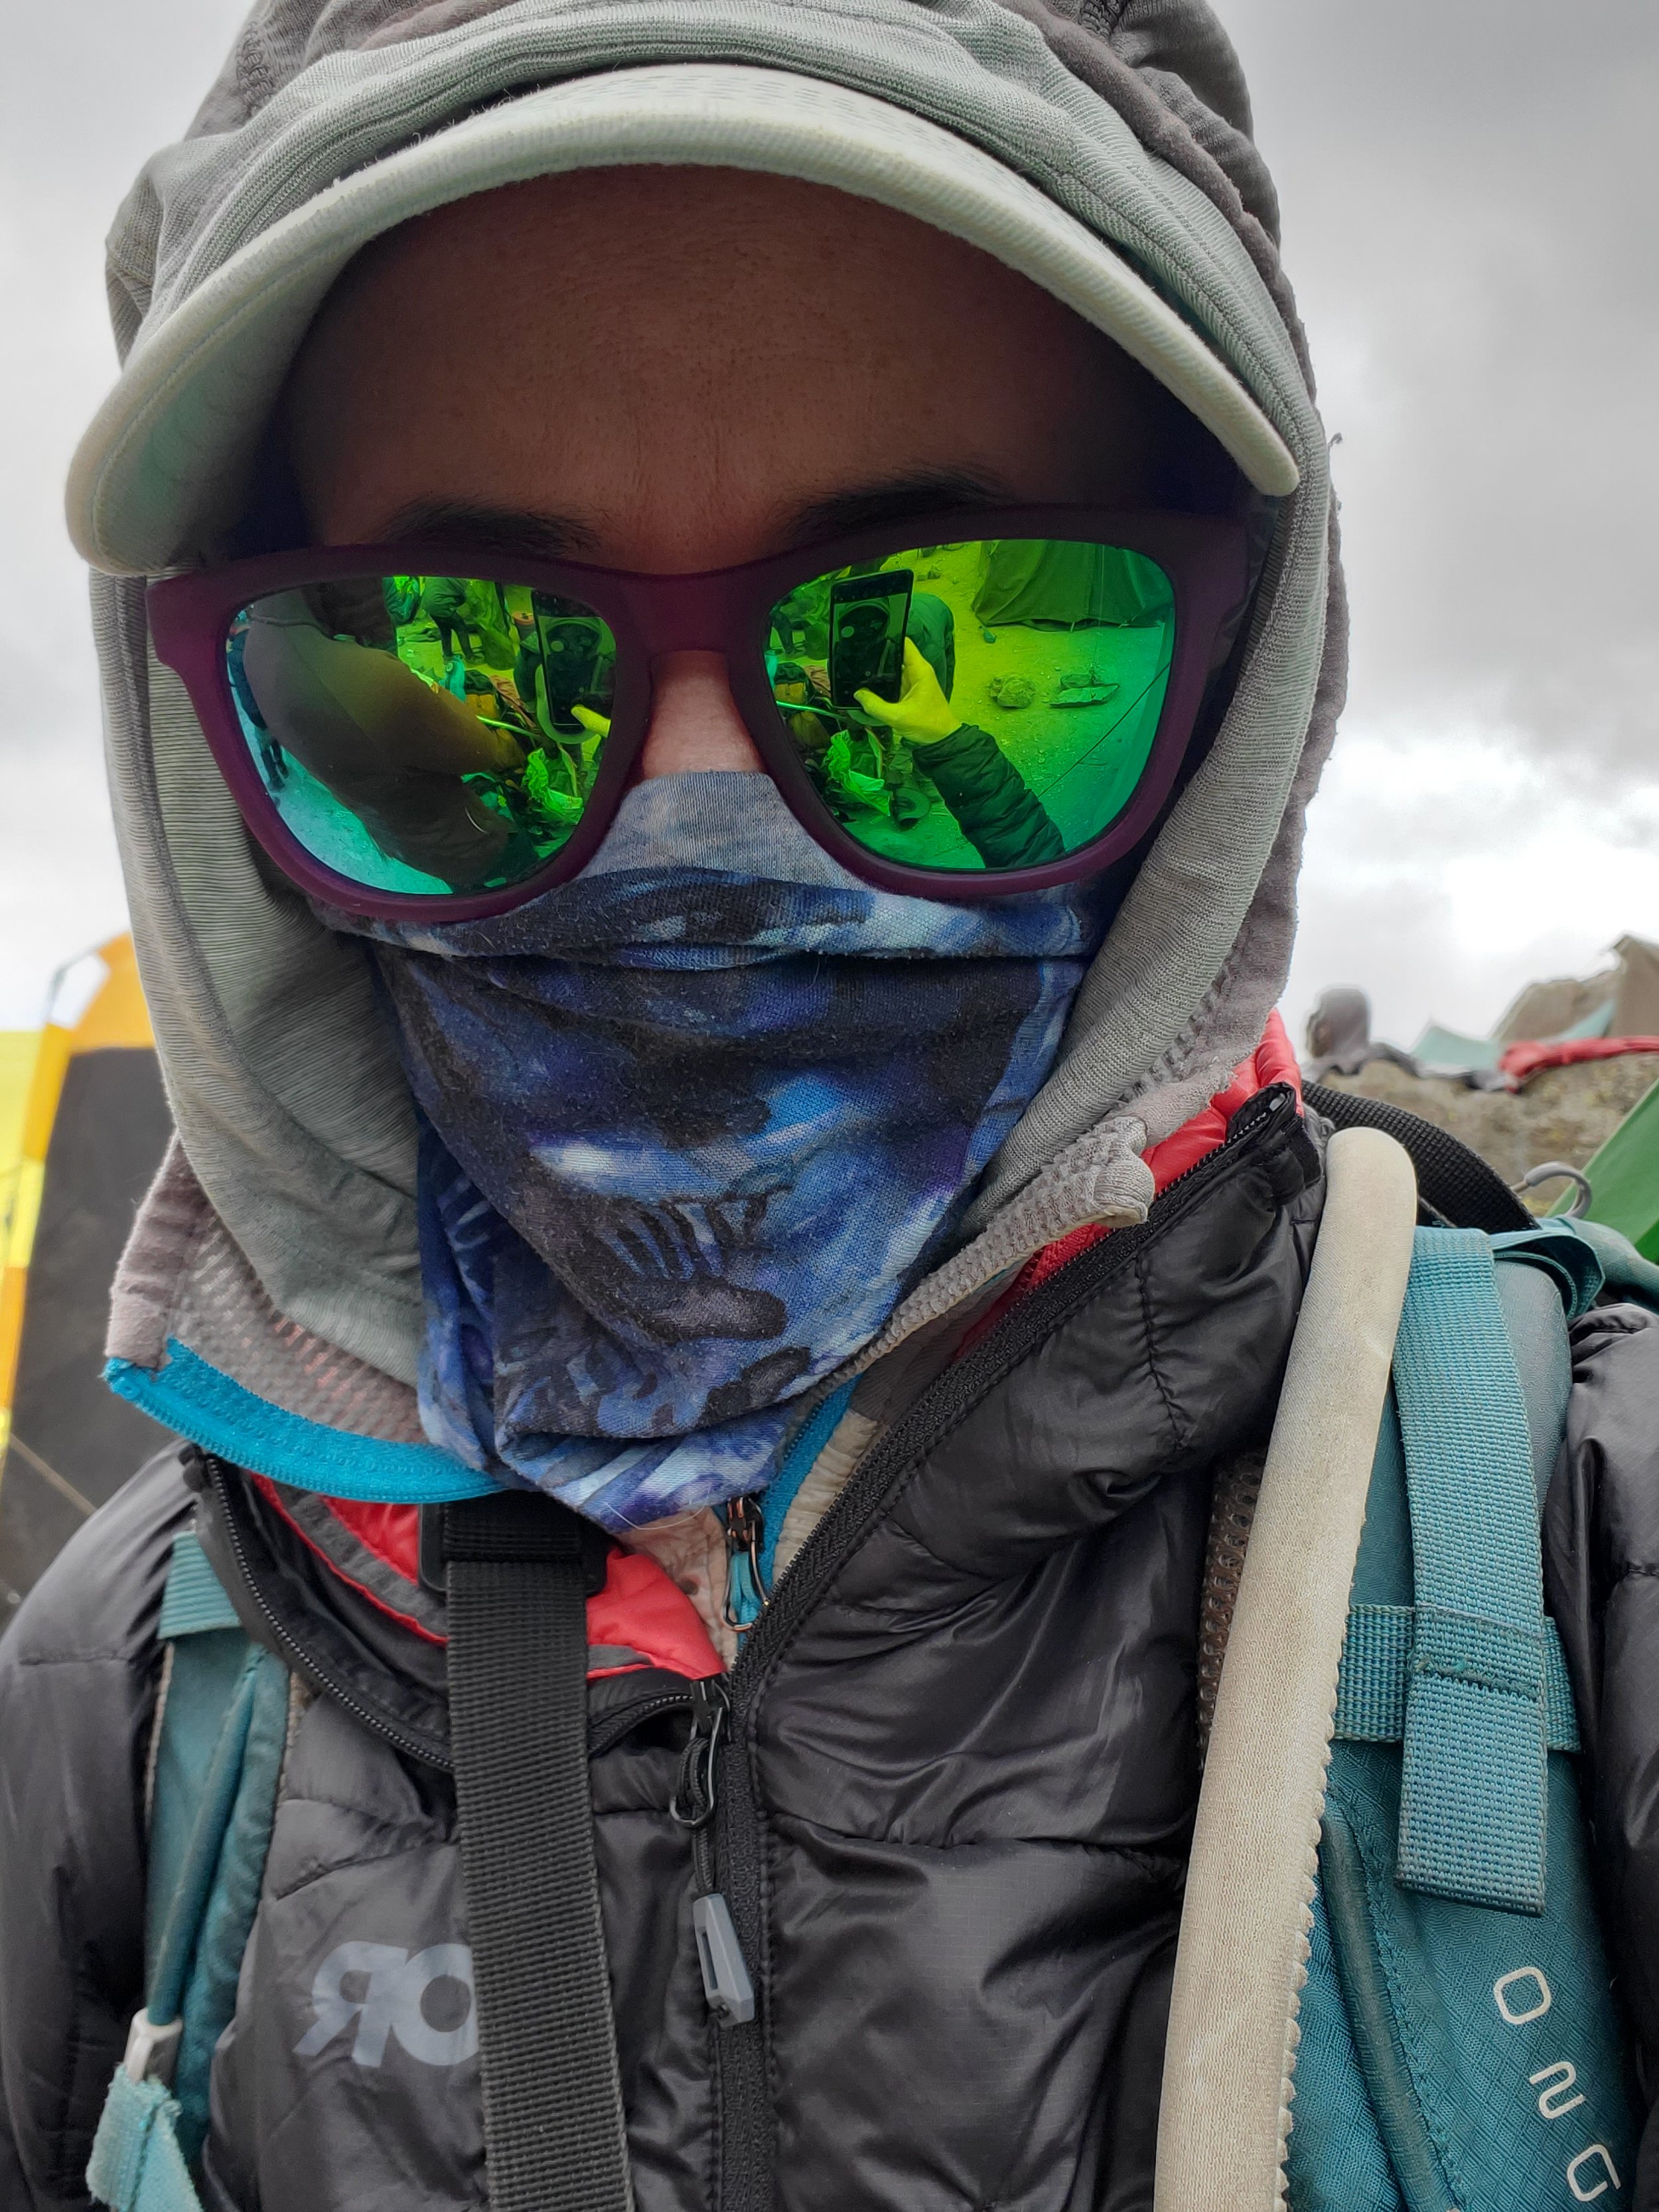
My typical look on chilly days. [Visual description: Close-up of (me) with grey hood, ball cap, purple sunglasses, blue buff covering my face, black down coat, wearing day pack].
Hats. You really only need two hats: one warm beanie & one ball cap or safari-type hiking hat.
One light pair of gloves & one warm pair. I have a sturdy pair of OR driving gloves that worked great for evenings in camp, cooler mornings, and underneath down gloves on summit night. As for the down—best for foot warmers at night but I also wore them (and needed them) for the summit.
Sun gloves (Optional). Sunscreen washes off with repeated hand-sanitizer use. There are intense rays at higher elevation, plus if you take doxycycline for malaria prophylaxis that will contribute to sun sensitivity as well. My hands were like over-toasted bread & took almost two weeks to entirely heal. If you don’t wear gloves on a daily basis, you’ll need to obsessively re-apply sunscreen!
Bandanas. Two regular bandanas. I needed them for my nose and the constant dust. Bring the soft, nose-friendly kind. Switched half way through and was able to hand-wash one…and then used it as a towel for my feet. Bandanas have a horrible job!
Buffs. 2-3 regular type which are versatile for neck cover, face cover, ear cover, drying things, backup towel... Consider a 3rd buff that is warmer. In my case, the “one size fits all” turtle fur buff just slipped off my face no matter how I layered it. Test out your gear before you use it for the first time! Oops.
Skida headband. I use this headband all the time because it fits over my ball cap. It keeps my hat from blowing away and protects my ears from cold or sun. Headbands are super lightweight. Very useful if you go the ball cap route! I refuse to wear the floppy hat with a string but that option works well for many.
*2 bandanas, 3 buffs, and a headband may seem excessive but these are portable & practical items!
Balaclava (Optional). I’ve found these to be useful in past chilly environments. However, I absolutely hated the balaclava for summit night on Kili. I felt it was choking me & had to remove it. A regular buff worked best, but I know others have found the balaclava useful for the summit.
7. Other Trekking Necessities.

Thawing out at Shira I Camp. Our tour operator’s tents were in good condition & more spacious than expected. [Visual description: Orange tent with frost, frosty ground, sunshine, other multi-colored tents in background].
Hiking poles! Bring your own or rent a pair. Your body will thank you for using them. My rentals worked fine, although if I had a re-do, I would have brought and gifted a pair to a guide at the end of the trek.
Sunglasses. I know every list says “wraparound” sunglasses & those are probably best, but $25 Goodr sunglasses worked just swell. Plus, they have fun names & colors.
Basic blister kit & KT tape. I brought a handful of KT tape strips & my knees were thankful. KT tape can also be used for blisters, but hydrocolloid blister pads are my favorites for prevention & treatment. The guides carry a more extensive first aid kit, so I didn’t feel the need to bring more. Know how to use the KT tape before you go!
Nail clipper & tweezer. Bring your own.
Braces. Like I said. If you don’t wear high-top boots or shoes, ankle braces are recommended to avoid any trek-ruining injuries. A light knee brace also came in handy. But, you do you for any chronic aches & pains.
Airlines pillow (Optional). Steal the pillow! Far superior to DIY stuff sack pillows! Also, for $1200 a ticket and for messing up my diet restriction request on a 16 hour flight, I feel entitled to multiple pillows from Qatar. There are packable camping pillows available, but I find all of them to be wildly uncomfortable. Plus, the airline pillow option is free (well, sort of).
Extra shoelaces. Just in case yours break. But more importantly, you can string two together to make a clothes hanging line. I did this in the tent every night to dry out sweaty clothes and in-town at the hotels after hand washing. Simple, cheap, and functional.
8. Toiletries For Keeping Clean.
Biodegradable wet wipes. I used the Surviveware brand which worked decently for sensitive parts & skin. I ended the trek with exactly one wipe left. You will need these.
Small quick-dry camp towel. My one REI-brand camp towel (hand towel size) was truly grotesque by the end. A second one would have gotten sufficient use. You get a little bowl of water twice a day which is enough for your face & maybe upper-body, so a larger camp towel is overkill.
Toothbrush & paste. Enough said.
Hand sanitizer. Bottle or wipes. Use frequently! You won’t be able to wash your hands with soap & water, except in camp when a hand washing station is (sometimes) available.
Roll of toilet paper. Yes, you need your own roll but a regular size is fine. Our operator supplied TP in camp, but the Tanzanian type is a little rough & occasionally there was no extra roll available in the toilet tent. There also won’t be any TP along the trail, so always Ziploc some in your day pack just in case.
Disposable dog bags. If you need to dispose of TP or bleeding supplies on the trail, please put in a disposable dog bag & discard at camp later. Unfortunately, areas adjacent to the trail are littered with TP which trashes the land and is simply gross. Dog bags can also be used for general trash.
Face wash (stick form). This reminds me of those pop-up orange sherbet tubes, except soap. Anyway. I am a recent convert to multi-step Korean skin care, but needed to simplify my routine for travel. Pros: Mess-free, no risk of leaks, clean face. Cons: This Green Tea cleansing stick is wonderful, but a bit bulky.
Deodorant. I know this is a luxury item, but I used it and felt more human. A travel size is plenty.
Soap. Bar soap is a mess. The operator supplied a tiny bar & I did use it for my hands & upper body in addition to wet wipes. Additionally, the two times I washed my feet (Yuck!) Pros: No risk of leaking liquids. Cons: The sticky mess. I think my solid face wash stick would have been easier as a one and done for any soap needs. There is always a travel-sized bottle of Dr. Bronner’s…
Dry shampoo (Optional). Mixed feelings on this item. I used it twice and maybe it lessened scalp itchiness & made me smell like a coconut. But mostly my hair was a greasy, tangled mess that I hid underneath hats 95% of the time.
Bleeding products in Section 10…
9. Toiletries For everything else.
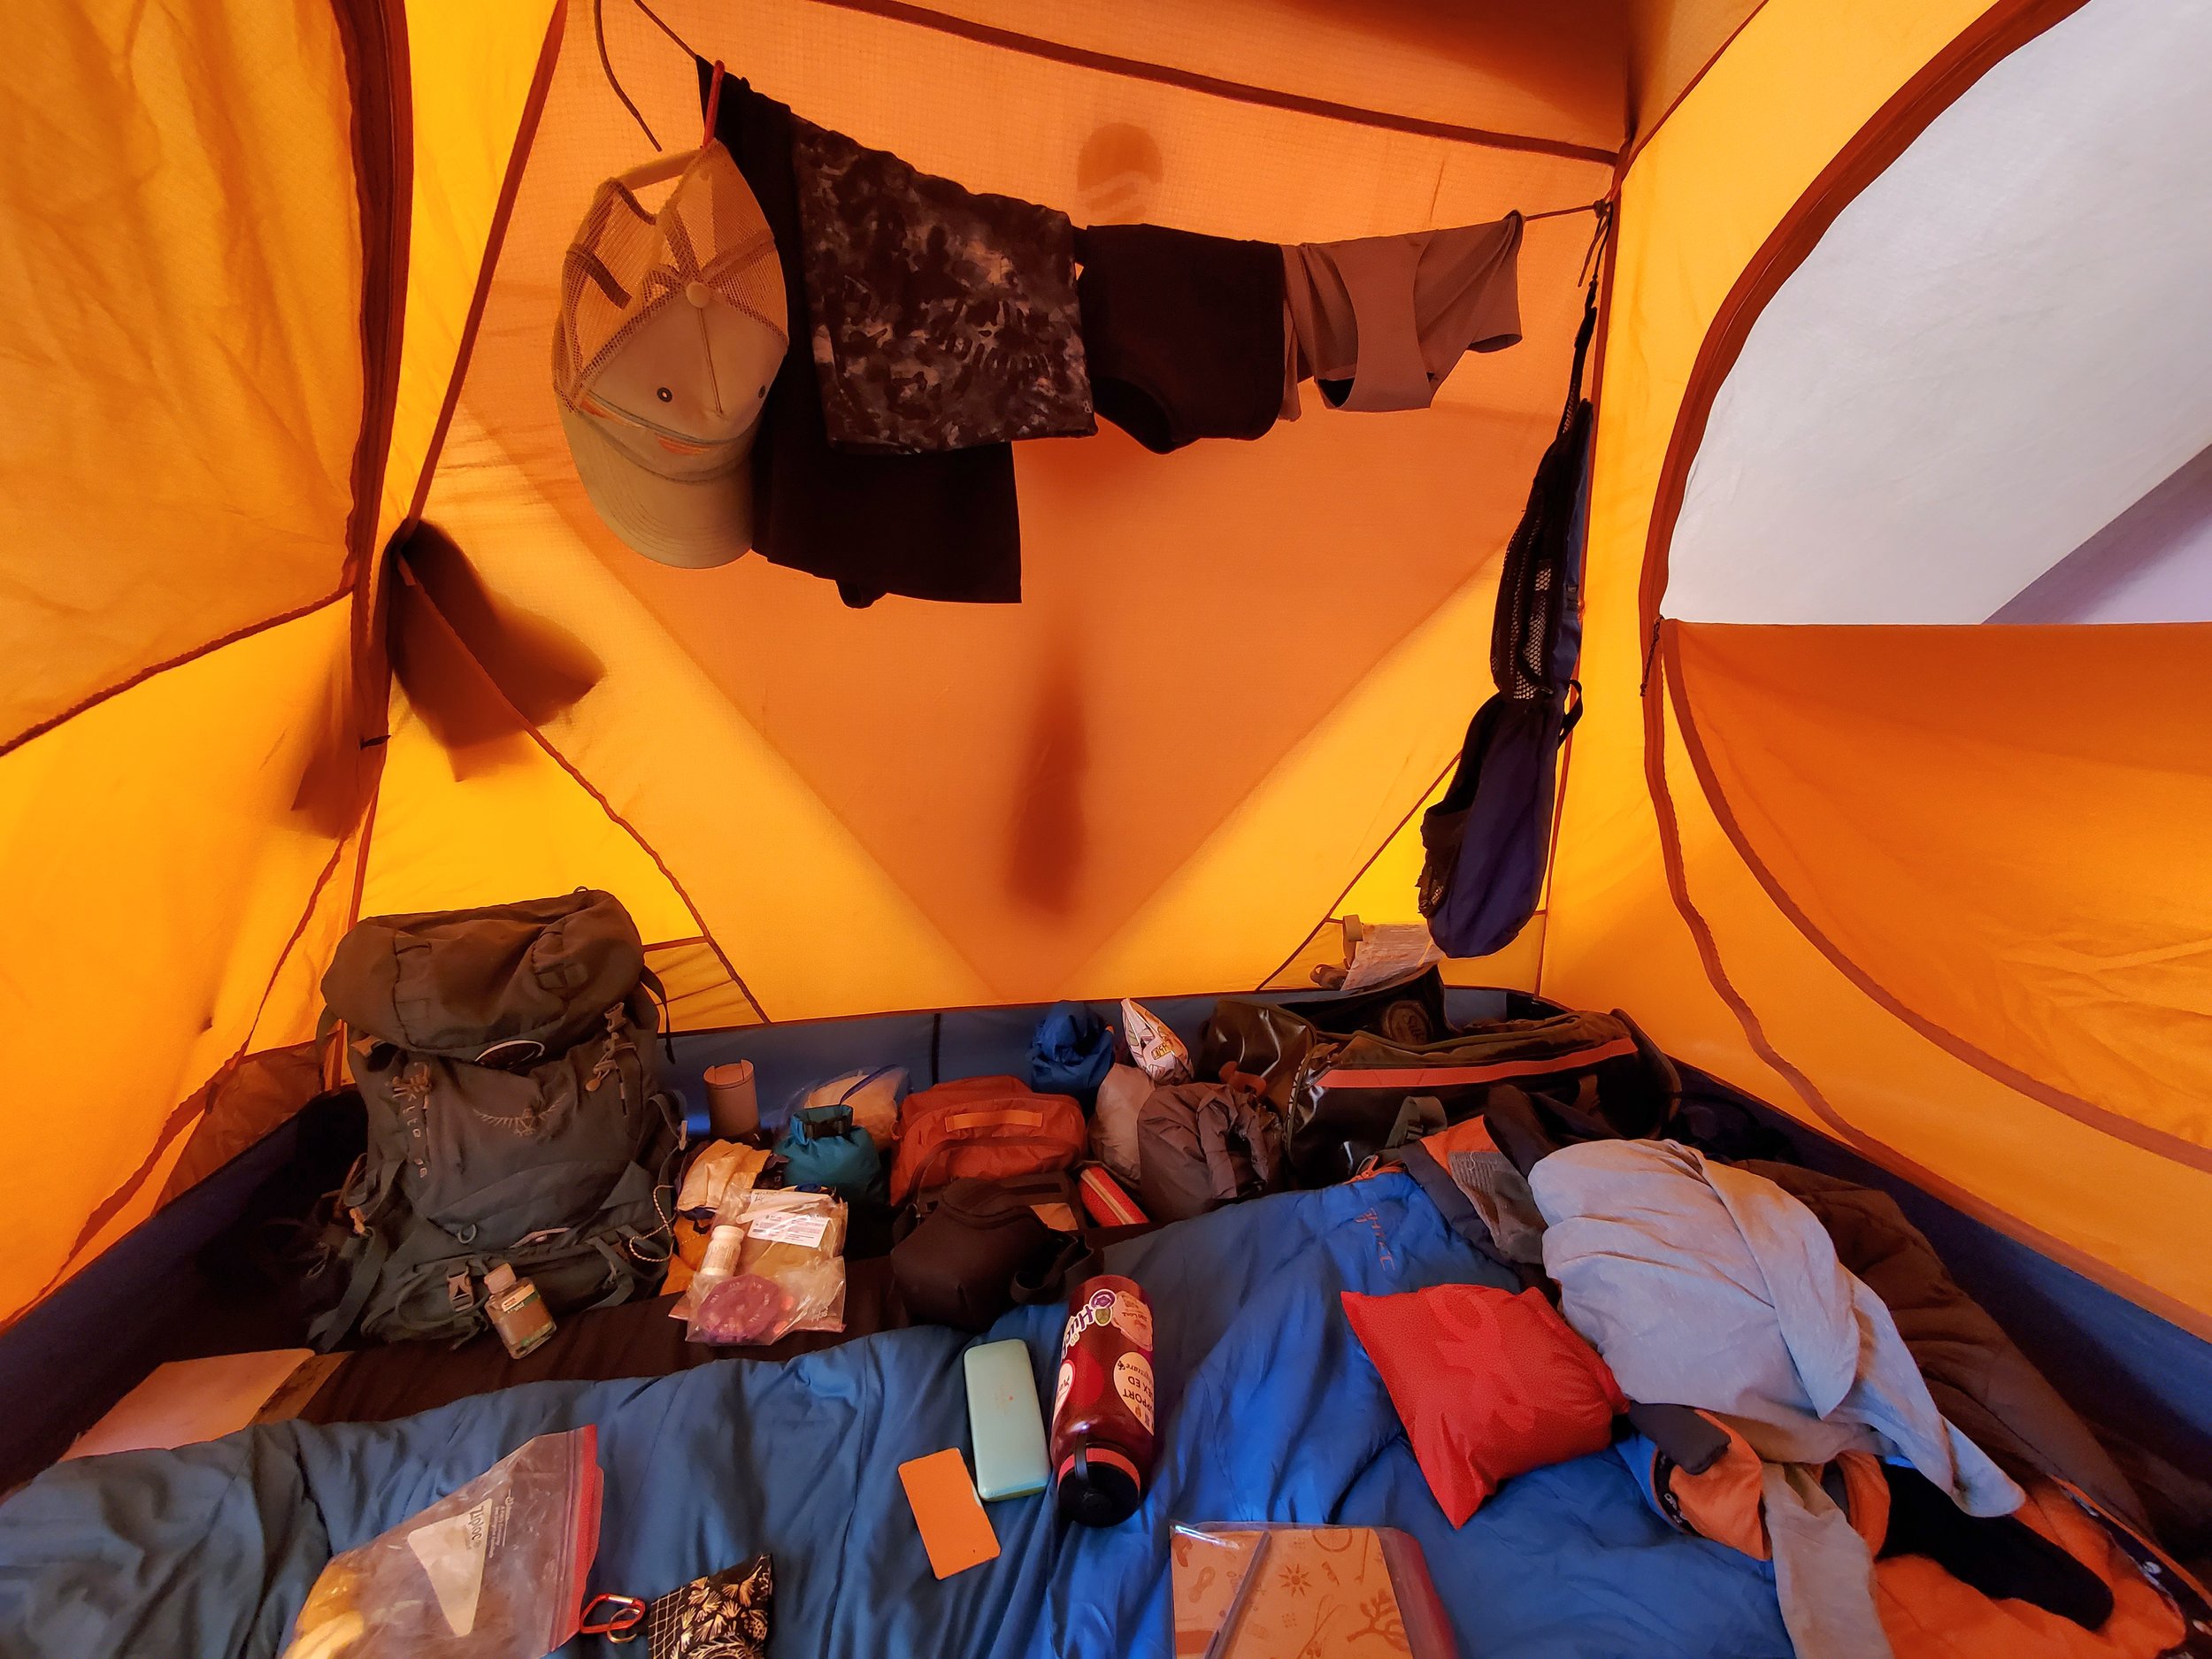
This is what I mean by methodical & mess. I knew where everything was. Sort of. [Visual description: Inside of the orange tent, shoelace hanging line across the sides with toiletry bag, clothes items to dry, hat to dry. On the tent floor is my daypack & duffle with various items strewn about on the side of the tent & on top of the sleeping bag].
Ear plugs. My ears ached from wearing ear plugs every night but you need them! Someone in camp is always awake at any hour & rustling around. Or snoring.
Eye mask (Optional). Personal preference. I lost my silk one during the duration of the trip but the Qatar airline eye mask sufficed. (Keep the eye mask!)
Bug spray. Tiny, tiny travel size is plenty as you only need this the first & last days of the trek in the jungle (and in town). If you can find quality bug spray towelettes that would be ideal for the trekking portion.
Sunscreen. SPF 50+ and water resistant. I opted for the lotion versus the spray as I was paranoid the spray bottle would break leaving me with nothing.
Lip balm with SPF 30+. Be serious about lip balm. I used some regular chapstick with regular SPF in Nepal and have never burned my lips so badly in my life. I avoided any lip burn on this trek but I applied and re-applied habitually.
Small face lotion. This was truly a need; my skin cracked & peeled regardless of sunscreen use. Also used it for my painful, peeling hands.
Disposable contacts and eye drops. Disposable is so much easier than dealing with contact solution & little plastic cases. I always bring a few extra pairs just in case. Did I mention dust yet?! Even with sunglasses protection, my eyes were gritty at times. Good quality eye drops are a must.
Tiny little mirror (Optional). You can use your phone camera, but I found the mirror helpful for applying & removing my contacts every morning & evening.
Glasses and case. You won’t want to wear your contacts full time back at camp. My glasses became truly warped from all the weather extremes, so be prepared to need an adjustment once you get back home.
Disposable glasses cleaner squares. Cloth will just get filthy. The cleaners are not only useful for regular glasses & sunglasses, but also camera or phone lenses.
Hair ties! Your hair will get in rough shape & you’ll want it out of your way.
Anti-chafing stick (Optional). If you use this at home for activities then of course! Bring it! But if you have never used it before and have never needed it before…no reason. Not sure why I felt this was necessary. I probably read about this on someone else’s list!
Makeup (Not recommended). Sometimes I do wear a foundation with SPF for hiking to add more sun protection. But I’m so glad I decided against bringing this on the trek! It would have just gotten filthy & added to my already-extensive toiletry bag(s).
Biofreeze or similar icy hot strips (Not recommended). If your skin is dirty/sweaty (which it will be), these don’t stay on very long. They were messy and impractical on the trek. I tried so you don’t have to.
*You don’t need “extra” toiletries. Really. I used what I used. But I did not need 6 pairs of ear plugs or two small lotions. I also have a fear of running out. But. You’ll be fine.
10. If you have a vulva (Brief list).
Peeing device. I strongly recommend the pStyle brand. I was skeptical but I loved & used this peeing device the.entire.time on the trek. My friend & hiking partner gifted me this along with a handy cloth bag for storage.
Kula cloth. Or similar brand. This is for wiping away urine versus using toilet paper. I’ll be honest, I have mixed feelings but many find this cloth useful…
Bleeding products. If you do bleed, I suggest period underwear first and foremost. Period underwear works great just for sweat too! Menstrual cups may be tricky due to limited water. Tampons and pads have the obvious downside of proper disposal.
*Pending additional post on all things underwear, peeing devices, pee cloths, and bleeding products! Because details on these topics are so important!
11. Medications.

I don’t necessarily recommend bringing ALL of this. Maybe just a few of these items…[Visual description: Two ziploc bags with prescription and OTC medications with sticky note listing all the medications. Hydrocolloid pads & KT tape, as well as the anti-chafing stick, tiny scissors, clippers, benadryl itch relief stick, and triamcinolone ointment]. I did not use 80% of the medications.
I always assemble a travel mini-pharmacy, and I won’t list each individual item here. Don’t take meds unless needed, but it’s better to be prepared as there is no drug store down the road.
This isn’t medical advice, just the basics. Talk with a travel medicine provider if one exists in your area. Or your primary care provider, although not all PCPs are savvy about travel medicine. Make sure to bring your operator’s list with prescription recommendations to an appointment to help justify your requests.
Prescriptions. At a minimum you need an antibiotic for traveler’s diarrhea (usually Cipro or Azithromycin), malaria prophylaxis (several options), and Diamox (or dexamethasone) for altitude sickness prevention and/or treatment.
To the people with a vulva: If you are prone to urinary tract and yeast infection, talk to your provider about prescriptions just in case (those won’t be on your operator’s gear list either). Antibiotics like Cipro can also cause a yeast infection, so be prepared.
OTC. At a minimum you need, Ibuprofen and Peptol Bismol or Immodium. Be careful with the latter two, talk to your medical provider. Additionally, cough/cold/allergy medications come in handy especially with the dust. For example, if you take Flonase daily, keep up with that! I certainly needed the Ibuprofen for muscle pain & ginger for settling my gut.
12. Food & Drink.

This was a light, colorful meal before we started trekking day 1. The food was so fresh. [Visual description: White plate with strips of chicken with orange sauce, white rice, zucchini and broccoli, and carrots. Plate is set on an off-white tablecloth with brown and tan flowers. Knife and fork].
As far as food…This depends on your operator & what they are feeding you. We had three hearty meals a day plus an afternoon hot drink & light snack. I ended up giving away 90% of my snacks to the porters as I didn’t really need them. I was really worried about coffee—you won’t get the incredible Tanzanian beans, but the instant stuff was just fine. The only thing you really need is…
Electrolyte drink mix! It’s what plants, scratch that—humans, need. Powder or tabs. I find the tabs less messy & prefer the Nuun brand, but any type you like is fine.
Other food/drink I personally used was: Non-dairy creamer in my coffee (powder packets), decaf tea packets (the Tanzanian teas are great, but none are technically decaf), and Justin’s individual peanut butter high protein packets. Sorry not sorry. Our operator actually had peanut butter but it was, like, half a container, and I would have eaten the entire thing in two days.
Other snacks I brought but didn’t use on the trek were: Mini GoodRx bars, Salmon/tuna packs and instant oatmeal. Honestly, these snacks were more useful on the airplane or in town when we got too busy to order a proper dinner.
Bring what sounds good to you, but I doubt you’ll need much!
13. Electronics.
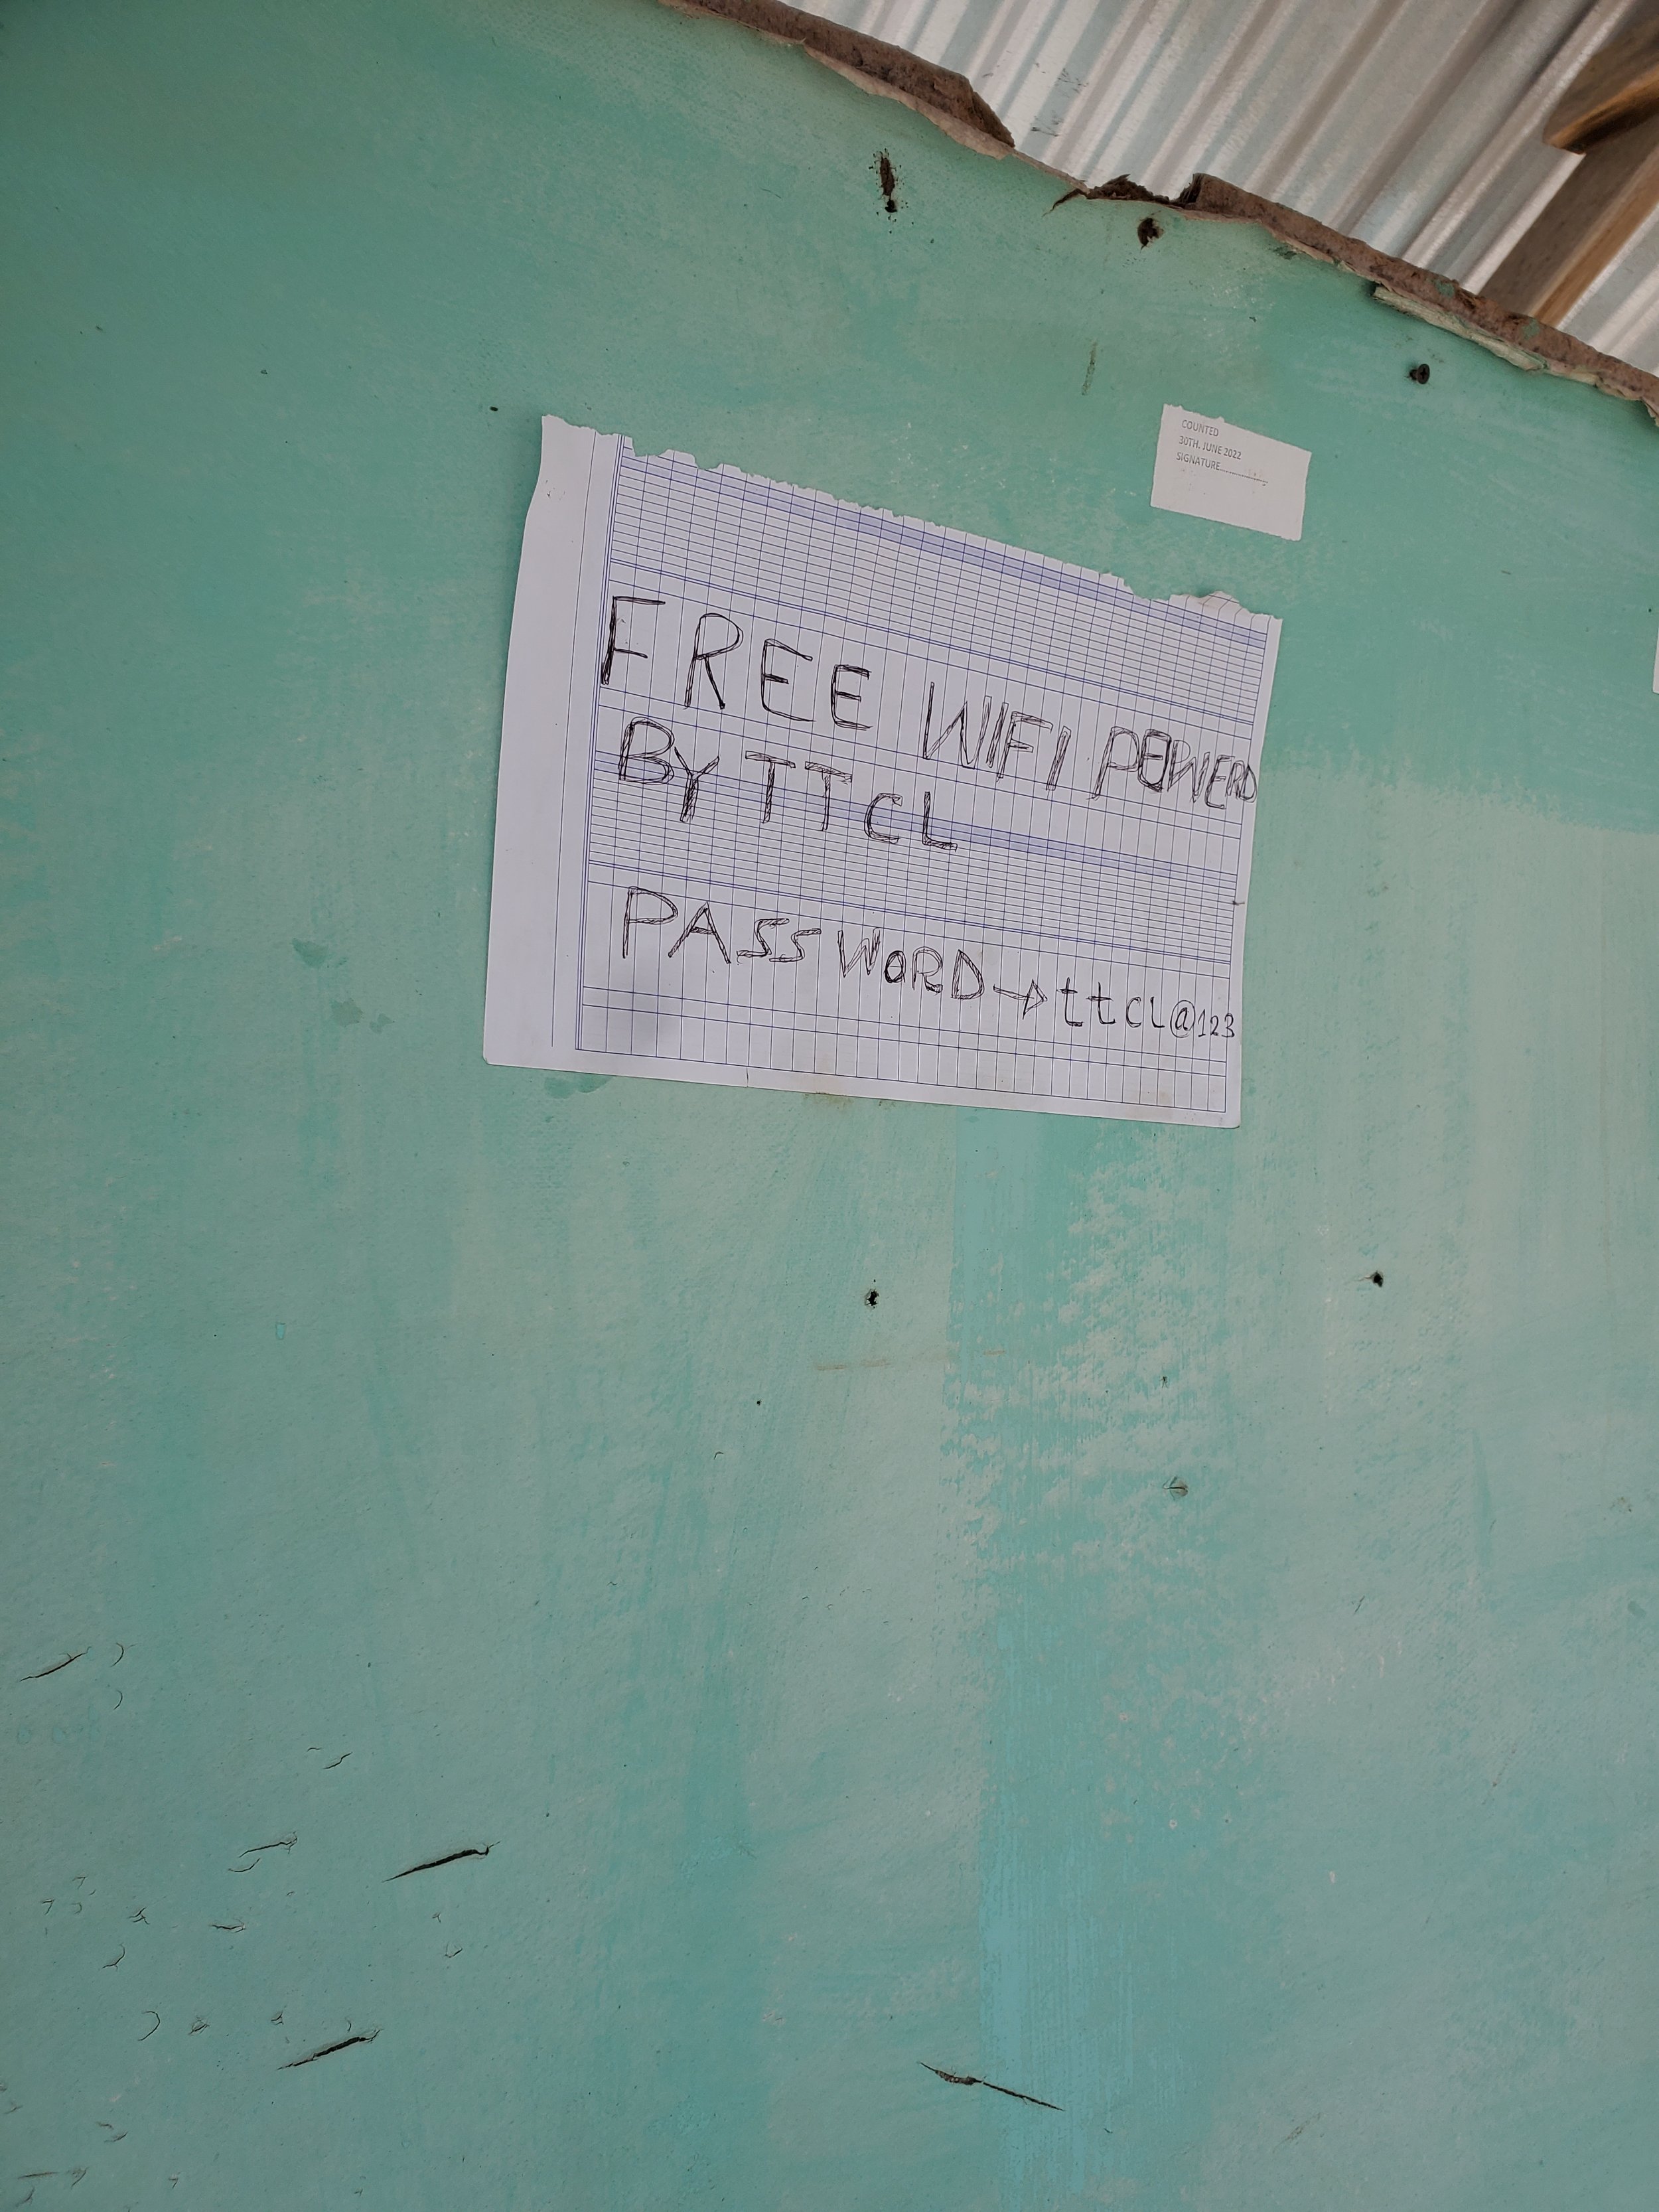
The Kibo Hut wi-fi info. I used it long enough to send a few What’s App messages & turn my phone back on airplane mode. [Visual description: Piece of paper with handwritten wi-fi login username & password. Taped to a green board. Rest of the green board is empty].
You will want to protect all electronics from dust, rain, cold by wrapping with a wool sock or a small dry bag or another warm container. Everything stops working properly if it gets too cold, too dusty, or too wet.
Phone. My main use for my phone was taking over 1300 photos and videos. You can get service if you buy a sim with a local carrier and our porters found service occasionally. Kibo Hut (camp) has limited wi-fi if you stand by the wi-fi login sign. I was thrilled NOT to have service 95% of the time. Take advantage!
Camera. I have an older camera that takes decent landscape photos & zooms better than my phone. Bring a resilient camera of some sort whether this is your phone backup or primary camera. Bring a backup battery & make sure all are fully charged before you go.
Power Bank. After some research, purchased the Iniu battery pack. I made sure it was 100% charged prior to the trek & only used it for charging my phone. After ten days, I still had about 40% power left so this pack was a great purchase. Solar charges are another option, but make sure to test yours out because they can take a while to charge. Also consider if you are sharing a power bank with multiple people, you’ll want multiple banks.
Charging cords. Make sure you have cords/plug-ins that are compatible with your different devices!
Headlamp & spare batteries. You will use the headlamp often. Swap for fresh batteries on summit night as you will be hiking in the dark. We had some moonlight, but you need a functional headlamp. These were the only non-rechargeable batteries I brought.
Solar powered lantern. Put this in your backpack mesh or clip to a carabiner on the outside of your bag so it can charge in the sun during the day. Inflate in the evening & hang inside your tent for light. Luci Lanterns (or similar) are so nifty, simple, and make great gifts for local staff. I always use these for backpacking, travel, or in places where electricity is iffy or not available.
Adapters. You only need these in town to charge everything before & after the trek, don’t bring them on the trek itself as there are no plug-ins!
14. Optional Items.

It’s true. [Visual description: My white/burnt hand holding a blue pen & brown journal that says: A Life Outdoors is a Life Well Lived. Outdoor background is blurred].
Journal and pens. I love to document my journey even if brief, write down plant names, and invite others to write. I have all of these lovely messages in Swahili in my journal which I still need to translate.
Mug with lid. I require boiling hot liquids and my little 12 oz insulated mug was perfect for the morning tent coffee & later in the day for teas, hot chocolate, etc. I always travel with a mug & this one was relatively new & doubled as a gift before leaving.
Carabiners. I mean, these are optional but having a few always come in handy! Just the cheap kind are fine.
Cloth face mask. Covid or no covid. I hiked with a cloth face mask for several days of the trek, especially in the beginning. The dust is unreal and my mask was positively caked with dirt after two days of trekking. A buff would work, but the mask stayed on my face easily & did the trick. Several other hikers commented that they were jealous they didn’t bring their mask!
A book. Thankfully I left mine at the hotel and no regrets. No way could I have concentrated on a book. This was a risky decision as an avid reader, but I journaled instead.
Headphones. This is a nice option if you have super lightweight ones, but I never used mine.
In Summary.
So, there’s the hyper detail-oriented, nitty-gritty packing list for your Kili climb. I’m not even including extra items you’ll find useful in town. But just add a few pairs extra clothes as you will not want to wear anything from the trek before washing it!
Also consider which items, if any, that you are willing to gift to the Tanzanian guides & porters. You’ll get to know these folks (I hope) & want to give them something extra. Most cannot afford gear & you can’t buy good quality outdoor gear in Tanzania either. I left a handful of items behind, but wanted to be mindful of how this was done. A lot of my gear has been heavily used or is stuff that I use consistently back home, so I didn’t leave those items. If I was to re-do this trek, I would plan this piece a little more clearly. And gifting items may not be right or possible for everyone.
Not camping but need simplified recommendations? I have a carry-on only packing list for travel just for that.
Anything else? I’m sure I forgot something…
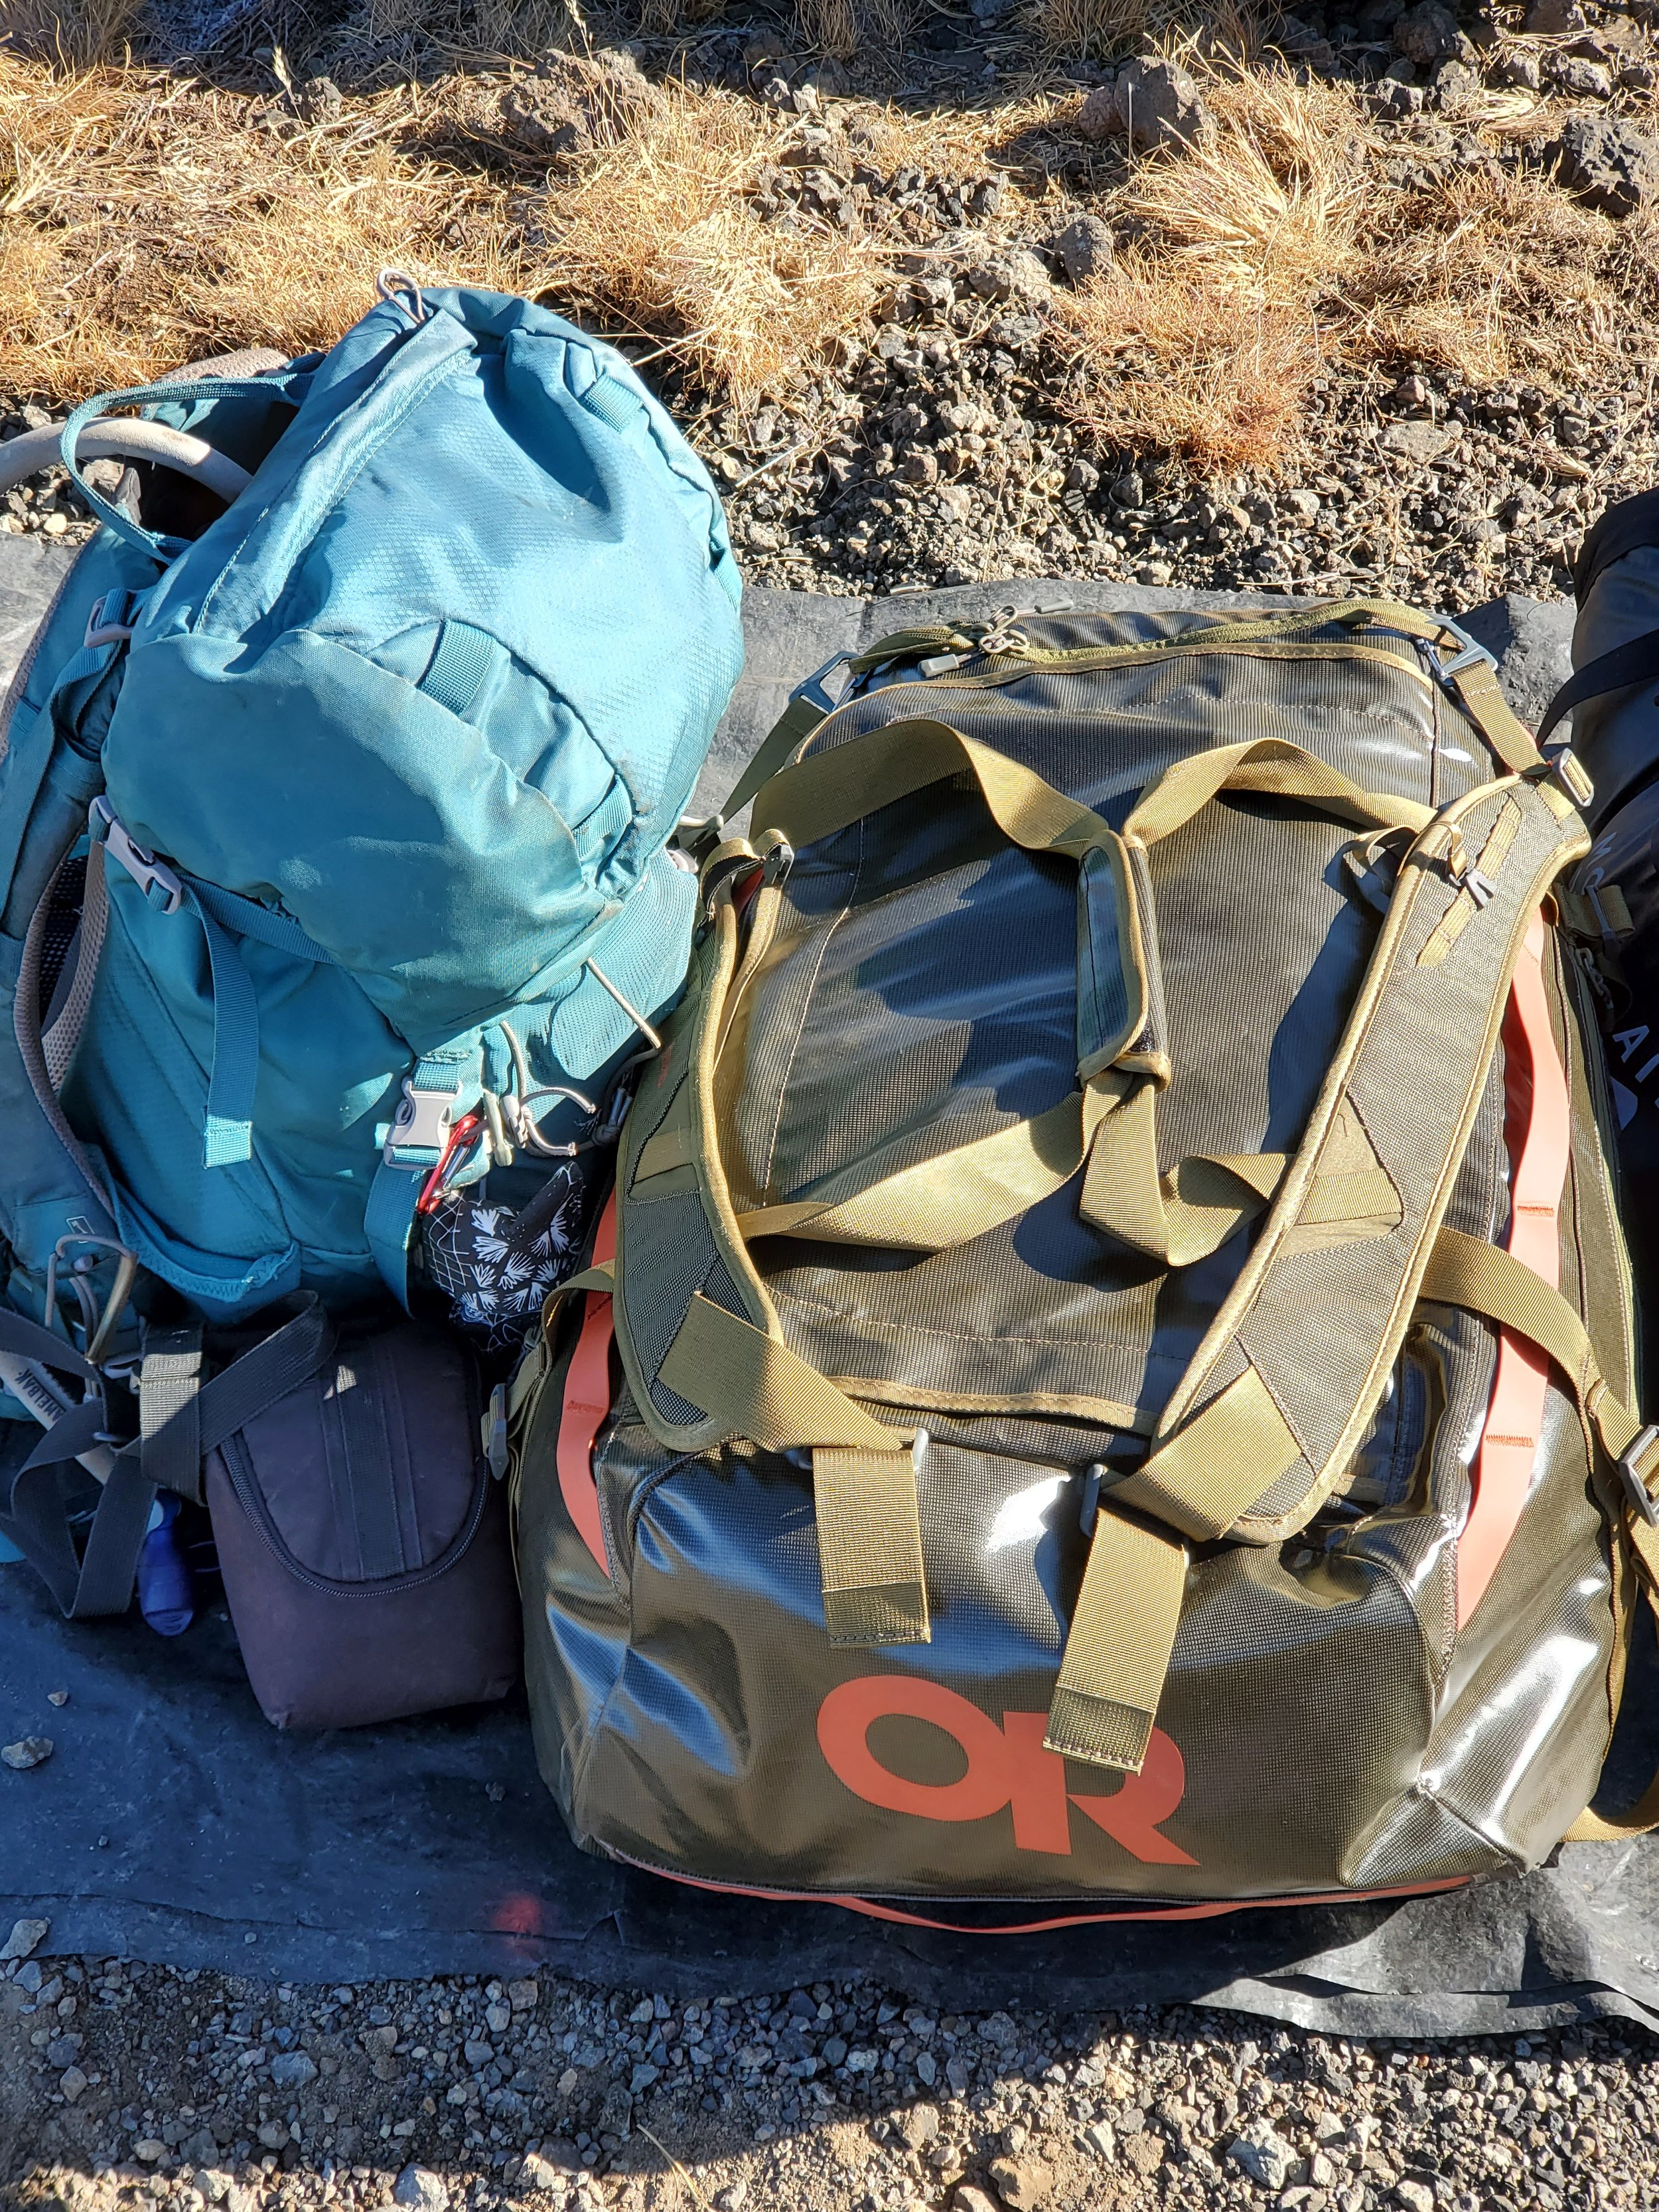
All my stuff for 10 days. Here it is. [Visual description: On left is greenish-blue Osprey daypack, my black “real” camera, and my 80 L green with orange lettering OR duffle bag. Both items sitting on a black tarp on the dirt].
More on Tanzania soon!